Thursday, March 29, 2007

29: Final floor layer

With the heating coil in place, it was time to jump back in the hole one more time to dig out and mix the final floor layer. This was going to be the thinnest and most wet layer yet, with a slightly increased amount of sand to hopefully prevent some of the cracking that had happened to the first finish layer.

Here's a photo of the wheelbarrows ready for the mixing:


And a bucket of the final mix with the last layer partially covering the heating coils:


The floor progressing:


The whole floor, after the first troweling, still extremely wet:


Another view:


After this I don't have any more good photos - my camera started having intractable technical problems, which was definitely a bummer. To finish off the floor, I went and troweled it smooth two to three times a day for the next 5 or 6 days. By that time it was clear that there were going to be some cracks that I was not going to be able to trowel out, so I dug out some of the most clayey earth from the hole, and pushed it through window screen material with my hands to form a thick, very smooth clay slip. This slip I troweled onto the floor in an extremely thin (less than a millimeter) layer, filling the cracks as I went, kind of like grout. I did this three times, and each time the cracks became smaller and less noticeable. After the third time I decided that it was good enough, since you could see the cracks only if you got down on your hands and knees to look. I let the finish floor dry for a couple more days and then started work on finishing the interior.

Wednesday, February 14, 2007

28: Heating Coil

After the first finished layer of the floor was dry to the point where it wouldn't stick to our shoes at all when we walked on it, it was time to lay the heating coil.

I had purchased 300 feet of the heating coil on ebay for about $40, and I don't doubt that it was made sometime in the 70s or 80s and had been lying around in someones garage or warehouse all this time. An internet search provided no information about the coil, much less the company that had manufactured it... But, it looked like it was in good working condition, and new electric radiant floor heating coils are five to ten times as expensive, so we proceeded to wire it up the only way we could think how and hope that it worked.

Fortunately a heating coil like this is an extremely simple thing - it takes 220 volt power, and you literally just connect one end of the coil to one of the hots on the 220 switch, and the other end to the other hot on the switch. When you flip the switch, electricity runs out of the switch, through the coil, and back to the switch. It creates heat by virtue of the fact that the wire is waaaaaay to thin for the amount of current that is being put through it, and the resistance causes heat.

The last thing I want to say about the heating was that after this experience with radiant floor heating, I am a HUGE fan of it and probably will not use any other heating in anything I build in the future (except a woodstove, of course). It is super-efficient, it keeps your feet warm, and you can keep the air temperature much lower and still be comfortable since you're not just getting convective heat transfer through the warm air, but also radiant and conductive heat transfer as well.

Here's some photos:

The heating coil pinned into the layer below with big metal staples:


The coil leads coming out of the wall:


The coil leads where the appear in the wall and where they will connect to the switches:


The thermostat and the switches (there are two heating zones on the floor, each controlled by a switch, and then the thermostat provides a master control. That way the zone under the bed can be turned off for the night to minimize EMF while sleeping):

27: Door

While I was waiting for the first finished floor layer to dry to the point where it was leather-hard, I started prepping the door. I had managed to secure this giant salvage solid core front door for free, but it was just way too big and had to be cut down. The initial dimensions were 7 feet 4 inches tall by 42 inches wide. We cut it down to 7 feet even and 32 inches wide. In retrospect, I wish I had been able to find a smaller solid core door that did not require the cutting down, as I think the cutting down (widthwise) damaged the integrity of the door handle/latch and that the door won't last as long as a result.

First we sanded it:


Then we beeswaxed it:


The beeswax does make it look beautiful:


Then we built the jam, which I don't have any photos of since my camera started having problems at that point.

26: Subflooring and first finished floor layer

After finishing the lath, it was time to start thinking about the flooring. This part was one of the two most interesting parts for me (the light straw-clay insulation being the other) since I had never done it before, and didn't even really know how you were supposed to do it. I bought a pamphlet from online for a couple bucks - one by Bill and Athena Steen. It was very helpful, but you can only get so much from a few pages of text and some line drawings. So, like a good science student I decided to do some experimenting.

With the same earth I used to make the light straw-clay, I made a couple test tiles of different formulations with different amounts of sand:


As you can see one of them cracked much more significantly than the other, so I went with the uncracked formulation:


Then, with the finish floor formula figured out, I went ahead and started putting in the subflooring. The subflooring was just straight earth, pulled out of the ground moist, but not moistened any further I raked it smooth and then tamped it with the tamper. The subflooring layer ended up being about 4 inches thick:


After the subflooring layer was solidly tamped, I mixed up a batch of the final finish mixture and applied the first of the two finish layers. This lift was about an inch thick and was much wetter than the subflooring. Here's a wheelbarrow of it:


And the first corner getting filled:


Chris troweling it smooth:


A little tamping just for good measure:


And finally Harper in his blue hat playing with some cracks that had formed in the first finish layer:

25: Lath (part 2)

After getting all the electrical installed and ready to go, the next step was closing in the walls completely by putting up the second half of the lath. When we cut the first half of the lath, we cut the second half at the same time, so this part went pretty quickly...

Here are some photos:

Dan helping wash the mud off the first layer of lath and the windows:


A few shoots of wheat growing out of the wall as it is drying:


A finished corner, with only the wainscoting piece missing:


Chris and the finished lath around the door:

24: Electrical

Ok, so here's some photos of putting in the electrical. Overall this part of the building process was pretty conventional. The two things that I did that were different were 1) I used conduit in the walls instead of romex to get some electromagnetic shielding and to keep the wires away from the light straw/clay, and 2) I did not install any electrical on the two walls of the house that the bed touches, again to keep the emf down.

Ok, here's the photos:

Chris running some conduit:


The future home of the lightswitch:


The conduit going over to the desk:


Chris marking the location of the exterior boxes:


Chris and the lightswitch (apparently photos of Chris are more interesting than photos of electrical):

Thursday, January 25, 2007

23: Light Straw/Clay insulation

Well, it’s been quite some time since I've posted. The longest since I began this project, in fact. Not to make excuses, but I have a couple good reasons: first, my camera ran out of batteries, and it took a while to get new ones. Second, I caught some sort of nasty cold that I'm just really coming out of now, after about 12, 13 days, so I haven't been able to make nearly as much progress as I wanted. Third, making the insulation is a very muddy job, so I haven't wanted to touch the camera. And, fourth, making and stuffing the insulation has been the biggest job so far on the house in terms of person-hours.

On that note too, I need to thank all the people who came and got muddy helping out with the insulation. This includes Chris T, Drew P, Chris C, Dan A, Miko, Lee, Meredith, Chien Wen, Mike, Jen B, and the four people from APO. Thanks all for your help. And thanks to Dave Sax. for taking most of these photos, since I was too muddy to do it.

Alright, on to the photos and descriptions. First off, this part was completely new to me and everyone else who helped, so there was a distinct learning curve. But, here's the basic process:

1) Dig a big hole.

2) Take the "good" dirt out of the hole (good dirt is stuff with at least 40% clay and little to no organic matter), and put it into a big 55 gallon barrel. Add enough water so that after mixing the water left on top of the solids at the bottom are a about the consistency of thin latex paint. Here's a photo of the barrel with the hole, which bigger than it looks - about 7 ft in diameter, and 3 ft deep:


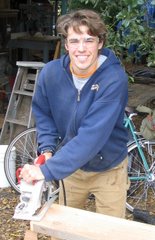
3) Mix up the barrel with this thing:


For those wondering, it’s a drywall mud mixing paddle. You have to use a pretty powerful drill with it - I used a 18-volt Dewalt cordless, but that’s probably just about the minimum, and even then the batteries were needing constant charging. I've heard of other people using corded drills, although you have to be more careful about getting shocked with that. And then I've heard of people using big two-handed augers, but only necessary for bigger projects.

4) Then pour the slurry through a 1/4" or even 3/8” wire mesh into a 5-gallon bucket to get rid of any stones or roots. Here's a picture of Lee doing some pouring:


5) Take a big plastic keg tub and put a flake or so of straw into the tub. Here's Chris C. and Lee getting some straw:


6) Pour some of the good stuff over the straw and mix until all the straw is coated. Its kind of like kneading dough, only takes much less time per batch:


7) Transfer the coated straw to a 5-gallon bucket, or some other sort of container, and carry inside. Here's Chris C. transferring, while Lee and I work:


8) Grab handfuls of the mixed insulation, and stuff it into the walls. Here I am stuffing and looking thoroughly muddy:


9) Repeat until done.

Alright, that’s the basic idea. I'm going to post a bunch more photos and then give a few observations on what I found worked well and what didn't, in case anyone is thinking of doing this themselves at any point. Here's the photos:

Me mixing up a bucket where some of the clay had settled out to the bottom:


A view of the walls with the ceiling:


A finished wall with 1x2 lath:


Looking out the door with a stuffed 1x4 wall section:


The lath on the ceiling:


A gratuitous photo of me looking muddy:


And another unnecessary photo of me with a partially stuffed wall (hey, my dad is constantly telling that he wants more photos of me...):


Ok, so here are the observations about this process in case anyone is thinking about doing this:

1) If your project is bigger than this one, I would thoroughly recommend getting or making some kind of auto-mixer, since mixing by hand made the process much longer.

2) I would recommend doing this when it is warm, since the whole process is a chilling one - you get pretty wet with cold water, and if its cold outside (as it was), then its just not that pleasant to work.

3) Get rubber gloves for the stuffing - keeps the hands much warmer/drier, which is nice.

4) Unless you have enough people to do two teams - one of mixers and one of stuffers, then I would recommend mixing up a huge batch, and then stuffing it all at once, rather than doing it piecemeal.

5) It is easy to let the mud-water get too thick, which means that you end up putting a lot of extra dirt into your walls, reducing the r-value (although increasing the thermal mass). In some of the photos the mud was too thick, and the straw's golden color doesn't really shine through enough.

6) It took me 6 bales of straw to insulate the 2x6 walls and the 2x10 ceiling (in case you don't remember, my structure is 120 square feet).

7) Doing the alternating lath on the ceiling didn't work, since the straw just wanted to fall back down. So instead we put up 4 boards in a row and then stuffed on top of them before doing the next four boards. This also allowed us to stick our hands over the straw and make sure there was some air space above it so that there could be venting of hot air in the summer out the soffit vents. The last two boards were kind of tricky, but we managed to make it work.

8) Be prepared for everything (and I mean everything) to get muddy, so just account for it and accept it.

9) I think the 1x4 worked better than the 1x2 - it was easier to get the straw into the wall, and for the vertical walls it seemed to hold in there pretty well.

Ok, that’s all I can think of right now. Have fun!

Tuesday, January 09, 2007

22: Lath (part 1)

Alright, so with the exterior finished (for now - I actually have one more thing to do, but it will come later), I've been working on the interior for a few days. I've got a bunch of photos, but first a couple more photos of siding:

A photo my sister took of me with the siding partially finished:


A picture of Chris putting up the final piece of siding:


And one of the finished siding:


Now, on to the interior. The order things have to go for the interior is: put up half the interior finished wall surface, then stuff the insulation in, then put up the other half of the wall surface, then put the floor in, run the wiring, hang the door, and finally add the built in furniture.

Ok, and explanation of the first step: putting up half the interior finished wall surface. What the wall is going to be is wood lath (long skinny and thin boards) nailed right onto the studs. I've put up every other one board, so there is still access to the inside of the walls, but only by sticking your hands inbetween the boards. What happens next is to shove the light straw/clay insulation into the wall, and then nail up the rest of the lath to fully close in the wall. This is different from what is normally done for light straw/clay insulation, and as far as I can tell has never been tried before, so I'll have to see how it works. Now onto the photos.

We had a bunch of long salvaged 1x2 moulding lying around, so the first thing I did was to mill the beveled mould off the boards so they are flat. I didn't manage to get any pictures of the milling, but here's a photo of the pile of sawdust I made - it doesn't look like it, but its over 2 feet high:


After all the 1x2 lath had been milled I had to get enough lath to finish what couldn't be covered with the 1x2, so back to Whole House, the salvage lumber yard, and I stocked up on standard 1x4. Some of it is doug fir, and some of it is pine, but I think the variability will look nice on the wall. Here's a photo of some of the 1x4 (plus some other lumber I'm going to need for built in furniture) in the back of the truck:


Look at all the salvage lumber - Whole house is a pretty sweet place. I ended up planing all the 1x4, but didn't get any photos of that. It looks really nice now though.

Then the lath had to be chopped to the right length. My housemated Dave helped do some of the chopping:


And a photo of the chop saw with some (but not all) of the scrap cut off the ends of the boards:


Here's a photo of a stack of some of the 1x2:


And a bigger stack of the 1x4:


Once we had finished milling, planing, and chopping the boards, it was time to put them up on the wall. Chris and I did all the 1x2 together on the lower half of the wall, and then I put up the 1x4 on the top half by myself. Here's a picture of the 1x2 on the wall:


And one with the wall lath finished, 1x2 on the bottom and 1x4 on the top:


Another one with the finished lath:


Next up is some work on the floor and the insulation.